Showing posts with label fedora. Show all posts

1.21.2015

Use iperf to measure network link bandwidth

Nice writeup on how to use iperf. Another example, writeup.
1. Install iperf
$ sudo yum install iperf

2. Start server on another system:
$ iperf -s
------------------------------------------------------------
Server listening on TCP port 5001
TCP window size: 85.3 KByte (default)
------------------------------------------------------------
[  4] local 10.1.1.1 port 5001 connected with 10.0.0.1 port 46699
[ ID] Interval       Transfer     Bandwidth
[  4]  0.0-10.3 sec   107 MBytes  87.7 Mbits/sec

3. Start client from your system specifying server ip:
$ iperf -c 10.1.1.1
------------------------------------------------------------
Client connecting to 10.1.1.1, TCP port 5001
TCP window size: 85.0 KByte (default)
------------------------------------------------------------
[  3] local 10.0.0.1 port 46699 connected with 10.1.1.1 port 5001
[ ID] Interval       Transfer     Bandwidth
[  3]  0.0-10.1 sec   107 MBytes  89.0 Mbits/sec

4. Use options, e.g., -t duration, -i interval between measurements
$ iperf -c 10.1.1.1 -t 20 -i 2
------------------------------------------------------------
Client connecting to 10.1.1.1, TCP port 5001
TCP window size: 85.0 KByte (default)
------------------------------------------------------------
[  3] local 10.0.0.1 port 46761 connected with 10.1.1.1 port 5001
[ ID] Interval       Transfer     Bandwidth
[  3]  0.0- 2.0 sec  17.6 MBytes  73.9 Mbits/sec
[  3]  2.0- 4.0 sec  22.5 MBytes  94.4 Mbits/sec
[  3]  4.0- 6.0 sec  21.2 MBytes  89.1 Mbits/sec
[  3]  6.0- 8.0 sec  22.6 MBytes  94.9 Mbits/sec
[  3]  8.0-10.0 sec  22.5 MBytes  94.4 Mbits/sec
[  3] 10.0-12.0 sec  21.2 MBytes  89.1 Mbits/sec
[  3] 12.0-14.0 sec  22.6 MBytes  94.9 Mbits/sec
[  3] 14.0-16.0 sec  22.5 MBytes  94.4 Mbits/sec
[  3] 16.0-18.0 sec  21.2 MBytes  89.1 Mbits/sec
[  3] 18.0-20.0 sec  22.5 MBytes  94.4 Mbits/sec
[  3]  0.0-20.1 sec   217 MBytes  90.6 Mbits/sec

Just want to take note: Bandwidth vs Throughput

Bandwidth : Refers how fast a device can send data over a single communication channel.
Throughput: Refers how fast a device is actually sending data over the communication channel.

1.07.2015

Prepare FC19 for RabbitMQ development

Got RabbitMQ install from here and here.

Install Erlang

1. $ sudo yum install erlang

Install RabbitMQ from RPM

2. $ sudo rpm --import http://www.rabbitmq.com/rabbitmq-signing-key-public.asc 3. $ sudo rpm -Uvh http://www.rabbitmq.com/releases/rabbitmq-server/v3.4.3/rabbitmq-server-3.4.3-1.noarch.rpm (or grab latest here)

Configure RabbitMQ SSL

TODO: outline steps

Install RabbitMQ management console

4. $ sudo rabbitmq-plugins enable rabbitmq_management

Open Firewall

5. $ firewall-cmd --permanent --add-port=5672/tcp 6. $ firewall-cmd --reload 7. $ setsebool -P nis_enabled 1

Start RabbitMQ as a daemon by default

8. $ sudo chkconfig rabbitmq-server on # To start the service: /sbin/service rabbitmq-server start # To stop the service: /sbin/service rabbitmq-server stop # To restart the service: /sbin/service rabbitmq-server restart # To check the status: /sbin/service rabbitmq-server status

Open RabbitMQ management UI

10. Browse to http://localhost:15672/

Install Bunny (Ruby Development)

9. $ gem install bunny Fetching: amq-protocol-1.9.2.gem (100%) Successfully installed amq-protocol-1.9.2 Fetching: bunny-1.6.3.gem (100%) Successfully installed bunny-1.6.3 2 gems installed Enjoy!

12.04.2013

How to Deploy a Rails App to Apache with Passenger

This guide is for Fedora Core 19, but I think it should be fine for any Linux machines...

Prepare System

1. Create a local account that will be used for passenger config
$ sudo useradd samdc
$ sudo passwd samdc
$ su - samdc
2. Install RVM and Ruby using this post (How to Install RVM, Ruby and Rails), up to step 10.

Install Passenger

3. Start apache
$ sudo apachectl start
4. Install passenger
$ gem install passenger
$ passenger-install-apache2-module
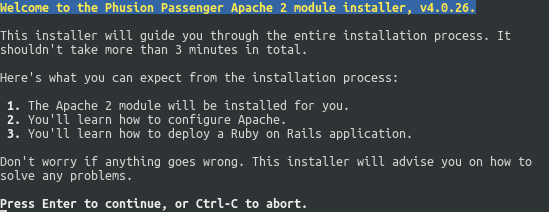
This runs the installer...
Press enter. The installer will check for required software, if the dependencies are not met, it will tell you what to install...
5. Install all missing dependencies and re-run the install
$ sudo yum install httpd-devel
$ sudo yum install apr-devel
$ sudo yum install apr-util-devel
$ passenger-install-apache2-module
A number of sources will be compiled and after that it will ask to update our Apache config...
6. To find out where the Apache config file is, try these commands
$ apachectl -V | grep HTTPD_ROOT
 -D HTTPD_ROOT="/etc/httpd"
$ apachectl -V | grep SERVER_CONFIG_FILE
 -D SERVER_CONFIG_FILE="conf/httpd.conf"
From that, our config file is in /etc/httpd/conf/httpd.conf

7. Our Apache config has this at the end.
$ cat /etc/httpd/conf/httpd.conf
...
IncludeOptional conf.d/\*.conf
Which means we can maintain our extensions separately. In our case, what we want to do is to create a file called passenger.conf, then we can add the lines as indicated by the passenger installer from step 5 of this guide.
$ sudo vi /etc/httpd/conf.d/passenger.conf
$ cat /etc/httpd/conf.d/passenger.conf
LoadModule passenger_module /home/samdc/.rvm/gems/ruby-2.0.0-p353/gems/passenger-4.0.26/buildout/apache2/mod_passenger.so
PassengerRoot /home/samdc/.rvm/gems/ruby-2.0.0-p353/gems/passenger-4.0.26
PassengerDefaultRuby /home/samdc/.rvm/wrappers/ruby-2.0.0-p353/ruby

Configure Apache

8. Create directories that we will use later
$ sudo mkdir /etc/httpd/sites-available
$ sudo mkdir /etc/httpd/sites-enabled
9. Add a virtual host for our rails app
$ sudo vi /etc/httpd/sites-available/depot.conf
<VirtualHost *:80>
   ServerName www.depot.com
   ServerAlias depot.com
   DocumentRoot /home/samdc/prod/depot/public
   <Directory /home/samdc/prod/depot/public>
      AllowOverride all
      Options all 
      Require all granted
   </Directory>
</VirtualHost>
10. Tell Apache about our virtual hosts
$ vi /etc/httpd/conf/httpd.conf
Add this at the bottom:
Include sites-enabled/*.conf
11. Link the virtual host definition to sites-enabled
$ sudo ln -s /etc/httpd/sites-available/depot.conf /etc/httpd/sites-enabled/depot.conf
12. Add ServerName entry to /etc/hosts file
$ vi /etc/hosts
127.0.0.1 www.depot.com
127.0.0.1 depot.com

Configure SELinux

13. Suspend SELinux
$ sudo setenforce 0
14. Install checkpolicy
$ sudo yum install checkpolicy
15. Walk through SELinux log and generate new SELinux policy module
$ sudo grep httpd /var/log/audit/audit.log | /usr/bin/audit2allow -M passenger
16. Make policy active
$ sudo semodule -i passenger.pp
17. Switch SELinux back to enforcing mode
$ sudo setenforce 1
18. Restart Apache
$ sudo apachectl restart

Deploy Rails App

19. Copy all files to the deploy directory
$ cp -r /home/samdc/dev/depot/ /home/samdc/prod/
20. Install all gems required
$ cd /home/samdc/prod/depot/
If using a different db in production, e.g., mysql, change the Gemfile to add that for production
$ vi Gemfile
group :production do
  gem 'mysql2'
end
$ bundle install
21. Create the database
$ mysql -u root -p
> CREATE DATABASE depot_production DEFAULT CHARACTER SET utf8;
> GRANT ALL PRIVILEGES ON depot_production.* TO 'username'@'localhost' IDENTIFIED BY 'password';
> EXIT;
22. Configure rails production yml file
$ vi config/database.yml
production:
  adapter: mysql2
  encoding: utf8
  reconnect: false 
  database: depot_production
  pool: 5
  username: username
  password: password
  host: localhost
23. Lets load the database
$ rake db:setup RAILS_ENV="production"
$ rake db:seed
24. Change production environment settings
$ vi config/environments/production.rb
config.serve_static_assets = true
config.assets.compile = true
25. Precompile assets
$ rake assets:precompile
26. Now browse to http://depot.com
10.15.2013

Open up Firewall of Fedora Core 19

Here's the whole write up on FirewallD.
How you would open up http and https, or specific ports for your box:
$ sudo firewall-cmd --permanent --zone=public --add-service=http
$ sudo firewall-cmd --permanent --zone=public --add-service=https
Restart the firewall:
$ sudo systemctl restart firewalld.service
Or on specific ports:
$ sudo firewall-cmd --permanent --zone=public --add-port=9393/tcp
Restart the firewall:
$ sudo systemctl restart firewalld.service

10.09.2013

How to add Launcher in Gnome for Fedora 19

Create a .desktop file:
$ sudo vi /usr/share/applications/aptana-studio-3.desktop
Add this content:
[Desktop Entry]
Name=Aptana Studio 3
Exec=/usr/local/bin/Aptana_Studio_3/aptana
Icon=/usr/local/bin/Aptana_Studio_3/icon.xpm
Type=Application
Categories=Development

10.03.2013

VNC Server Setup on Fedora 19

I followed this post to setup my VNC Server. Specific to my setup I had to update my /etc/systemd/system/vncserver@:1.service so that it will wait for autofs for my home directory:
After=syslog.target network.target autofs.service
Then I had to open up the ports for VNC as follows:
$ sudo firewall-cmd --permanent --zone=public --add-service=vnc-server