1. Remove every trace of rvm
$ rvm implode
Are you SURE you wish for rvm to implode?
This will recursively remove /auto/home13/delacs/.rvm and other rvm traces?
(anything other than 'yes' will cancel) > yes
Removing rvm-shipped binaries (rvm-prompt, rvm, rvm-sudo rvm-shell and rvm-auto-ruby)
Removing rvm wrappers in /auto/home13/delacs/.rvm/bin
Hai! Removing /auto/home13/delacs/.rvm

Note you may need to manually remove /etc/rvmrc and ~/.rvmrc if they exist still.
Please check all .bashrc .bash_profile .profile and .zshrc for RVM source lines and delete or comment out if this was a Per-User installation.
Also make sure to remove `rvm` group if this was a system installation.
Finally it might help to relogin / restart if you want to have fresh environment (like for installing RVM again).

2. Now follow this post to reinstall everything.
Showing posts with label rails. Show all posts
Showing posts with label rails. Show all posts
2.03.2016
RVM Implode
My rvm installation and ruby got messed up after a change in home directory mounts at work. Looks like rvm had referenced everything back in my old home directory full path. The only way I found to easily fix this issue is to re-install rvm, ruby and all gems I need including rails.
8.12.2015
Rails configure Webrick to use SSL
Came from this post.
Change bin/rails to be...
To generate certificates, follow this post.
#!/usr/bin/env ruby

require 'rails/commands/server'
require 'rack'
require 'webrick'
require 'webrick/https'

if ENV['SSL'] == "true"
  module Rails
      class Server < ::Rack::Server
          def default_options
              super.merge({
                  :Port => 3001,
                  :environment => (ENV['RAILS_ENV'] || "development").dup,
                  :daemonize => false,
                  :debugger => false,
                  :pid => File.expand_path("tmp/pids/server.pid"),
                  :config => File.expand_path("config.ru"),
                  :SSLEnable => true,
                  :SSLVerifyClient => OpenSSL::SSL::VERIFY_NONE,
                  :SSLPrivateKey => OpenSSL::PKey::RSA.new(
                                   File.open("certs/key.pem").read),
                  :SSLCertificate => OpenSSL::X509::Certificate.new(
                                   File.open("certs/cert.pem").read),
                  :SSLCertName => [["CN", WEBrick::Utils::getservername]],
              })
          end
      end
  end
end

APP_PATH = File.expand_path('../../config/application',  __FILE__)
require_relative '../config/boot'
require 'rails/commands'
For self-signed certificates as outlined here.
#!/usr/bin/env ruby

require 'rails/commands/server'
require 'rack'
require 'webrick'
require 'webrick/https'

if ENV['SSL'] == "true"
  module Rails
      class Server < ::Rack::Server
          def default_options
              super.merge({
                  :Port => 3001,
                  :environment => (ENV['RAILS_ENV'] || "development").dup,
                  :daemonize => false,
                  :debugger => false,
                  :pid => File.expand_path("tmp/pids/server.pid"),
                  :config => File.expand_path("config.ru"),
                  :SSLEnable => true,
                  :SSLCertName => [["CN", WEBrick::Utils::getservername]],
              })
          end
      end
  end
end

APP_PATH = File.expand_path('../../config/application',  __FILE__)
require_relative '../config/boot'
require 'rails/commands'
Then run server as...
$ SSL=true rails s
10.01.2014
Rails - Separate Seeds Using Seedbank
Seedbank gives your Rails seed data a little structure. Create seeds for each environment, share seeds between environments and specify dependencies to load your seeds in order. All nicely integrated with simple rake tasks.
This is how I quickly used it:
1.  Put in Gemfile:
gem "seedbank"

2. Install
$ bundle install

3. Create the specific seed file:
$ vi db/seeds/performance_translations.seeds.rb
translations = [
  ["r-high-0001","1-read high-generation"],
  ["r-high-0008","8-read high-generation"],
  ["r-high-0016","16-read high-generation"]
]
translations.each do |int, ext|
  PerformanceTranslation.find_or_create_by_internal(internal: int, external: ext)
end

4. Run via rake
$ rake db:seed:performance_translations
6.05.2014
Schedule rake using cron on rvm environment
Little tricky to get this going. The key is knowing rvm environment.
$ rvm env --path
/auto/home3/delacs/.rvm/environments/ruby-2.0.0-p353@RailsDev
For rvm, basic command line tools like gem, rake and ruby are in the wrappers directory.
$ crontab -l
SHELL=/bin/bash
PATH=/sbin:/bin:/usr/sbin:/usr/bin
HOME=/auto/home3/delacs
RAILS_ENV=development

0 7 * * * /bin/bash -l -c 'source ~/.bash_profile' && cd $HOME/Documents/projects/monweb_management && $HOME/.rvm/wrappers/ruby-2.0.0-p353@RailsDev/rake perfdb:get_baselines >> $HOME/logs/db.import.log 2>&1

5 7 * * * /bin/bash -l -c 'source ~/.bash_profile' && cd $HOME/Documents/projects/monweb_management && $HOME/.rvm/wrappers/ruby-2.0.0-p353@RailsDev/rake perfdb:get_published_runs  >> $HOME/logs/db.import.log 2>&1
1.09.2014
How to make Rails Turbolinks play nicely with jQuery
On Rails 4, AJAX in my pages are not being called because of turbolinks. The solution is to wrap the javascript code around the page load event. Got this solution from this post.
What works for me is this…
var ready = function() {
  ...your javascript goes here...
};

$(document).ready(ready);
$(document).on('page:load', ready);
12.16.2013
Rails 4 Connect Existing Database
Once connect strings are specified in database.yml file, just add a model as follows:
class TestResult < ActiveRecord::Base
  self.table_name = "Test"
  self.primary_key = "testId"
end
Now, lets check from the console
$ rails c
Loading development environment (Rails 4.0.2)
2.0.0p353 :002 > TestResult.column_names
 => ["testId", "analysis", "archive", "baseline", "description", "engineer", "name", "project", "reference", "retention", "link", "errors"]
12.11.2013
Deploying a Rails App Remotely With Capistrano
Modify Apache Config
1. Capistrano inserts a directory named "current" so change the DocumentRoot of the .conf file:$ sudo vi /etc/httpd/sites-available/depot.conf
DocumentRoot /home/samdc/prod/depot/current/public
<Directory /home/samdc/prod/depot/current/public>
Setup Git Server
2. Create an empty repository on the git server$ mkdir -p ~/git/depot.git $ cd ~/git/depot.git $ git --bare init3. Generate a public key and use it to give ourselves permission to access our own server
$ test -e ~/.ssh/id_dsa.pub || ssh-keygen -t dsa
Generating public/private dsa key pair.
Enter file in which to save the key (/home/samdc/.ssh/id_dsa):
Enter passphrase (empty for no passphrase):
Enter same passphrase again:
Your identification has been saved in /home/samdc/.ssh/id_dsa.
Your public key has been saved in /home/samdc/.ssh/id_dsa.pub.

$ cat ~/.ssh/id_dsa.pub >> ~/.ssh/authorized_keys
4. Make sure that proper permissions are set for ssh. I got another post related to this..
$ chmod g-w /home/samdc
$ chmod 700 /home/samdc/.ssh
$ chmod 600 /home/samdc/.ssh/authorized_keys
Prepare Application
5. Update Gemfile to indicate that we are using capistrano$ vi Gemfile
gem 'rvm-capistrano', group: :development6. Install capistrano using bundle install
$ bundle install7. If you havent done so, put project under git
$ cd app_directory
$ git init
$ git add .
Ignore files
$ vi .gitignore
.ruby-gemset
.ruby-version
$ git commit -m "initial commit"8. Copy all the gems required by your application into the vendor/cache folder. This also includes dependencies required by the gems. This helps because at the time of deployment you can just run bundle install --local to avoid dependency on the gems repository (rubygems.org) and install all the gems from the cached folder
$ bundle package
$ git add Gemfile.lock vendor/cache
$ git commit -m "bundle gems"
9. Push our code to the Git server
$ git remote add origin ssh://samdc@host/~/git/depot.git
$ git push origin master
Remote Deployment
1. Add necessary capistrano files to the project$ capify . [add] writing './Capfile' [add] writing './config/deploy.rb' [done] capified!2. Modify Capfile and uncomment one line
load 'deploy/assets'3. Modify deploy.rb, this is the recipe that we will use for deployment
require 'bundler/capistrano'

# be sure to change these
set :user, 'samdc'
set :domain, 'depot.com'
set :application, 'depot'

# adjust if you are using RVM, remove if you are not
set :rvm_type, :user
set :rvm_ruby_string, 'ruby-2.0.0-p353'
require 'rvm/capistrano'

# file paths
set :repository,  "#{user}@#{domain}:git/#{application}.git"

# stages
set :stages, ["staging", "production"]
set :default_stage, "staging"

# distribute your applications across servers (the instructions below put them
# all on the same server, defined above as 'domain', adjust as necessary)
role :app, domain
role :web, domain
role :db, domain, :primary => true

# you might need to set this if you aren't seeing password prompts
# default_run_options[:pty] = true

# As Capistrano executes in a non-interactive mode and therefore doesn't cause
# any of your shell profile scripts to be run, the following might be needed
# if (for example) you have locally installed gems or applications.  Note:
# this needs to contain the full values for the variables set, not simply
# the deltas.
# default_environment['PATH']=':/usr/local/bin:/usr/bin:/bin'
# default_environment['GEM_PATH']=':/usr/lib/ruby/gems/1.8'

# miscellaneous options
set :deploy_via, :remote_cache
set :scm, 'git'
set :branch, 'master'
set :scm_verbose, true
set :use_sudo, false
set :normalize_asset_timestamps, false

namespace :deploy do
  desc "cause Passenger to initiate a restart"
  task :restart do
    run "touch #{current_path}/tmp/restart.txt"
  end

  desc "reload the database with seed data"
  task :seed do
    deploy.migrations
    run "cd #{current_path}; rake db:seed RAILS_ENV=#{rails_env}"
  end
end
4. Create staging and production deployment files
$ cd config
$ mkdir deploy
$ vi production.rb
require "rvm/capistrano"                  # Load RVM's capistrano plugin.
set :rvm_ruby_string, 'ruby-2.0.0-p353'   # Or whatever env you want it to run in.
set :rvm_bin_path, '/home/samdc/.rvm/bin'
server "deployment_server_name", :app, :web, :db, :primary => true
set :deploy_to, "/home/samdc/apps/depot"
$ vi staging.rb
require "rvm/capistrano"                  # Load RVM's capistrano plugin.
set :rvm_ruby_string, 'ruby-2.0.0-p353'   # Or whatever env you want it to run in.
set :rvm_bin_path, '/home/samdc/.rvm/bin'
server "deployment_server_name", :app, :web, :db, :primary => true
set :deploy_to, "/home/samdc/apps/depot_staging"
5. First time deployment, setup basic dir structure on deployment server
$ cap deploy:setupUncomment default_run_options line in deploy.rb if there is any failure.
6. Check the config.
$ cap deploy:check7. We can load seed data.
$ cap deploy:seed8. Deploy
$ git add .
$ git commit -m "add cap files"
$ git push
$ cap deploy
Remember this deploys to the default "staging" server. To deploy to production...
$ cap production deploy9. Rollback deployment
$ cap deploy:rollback
Further reading:
http://guides.beanstalkapp.com/deployments/deploy-with-capistrano.html
https://github.com/capistrano/capistrano/wiki/2.x-From-The-Beginning
SSH Issue While Deploying Rails App Via Capistrano
Learned some lessons today about SSH and how to troubleshoot. While setting up Capistrano to deploy for the first time, I was getting this error message:
Following that...
Permission denied (publickey,gssapi-keyex,gssapi-with-mic,password)As it turned out, SSH is very picky when it comes to permissions. The solution is to set proper permissions for ssh authorized_keys file. Symptom is this error message from /var/log/secure
Authentication refused: bad ownership or modes for file /home/samdc/.ssh/authorized_keysWhich means, its a file permission issue as noted in this post.
Following that...
$ chmod g-w /home/samdc
$ chmod 700 /home/samdc/.ssh
$ chmod 600 /home/samdc/.ssh/authorized_keys
One thing to note is that when accessing that location using a different account, we have to make sure to copy the public key of that different account to the same authorized_keys file.
12.04.2013
How to Deploy a Rails App to Apache with Passenger
This guide is for Fedora Core 19, but I think it should be fine for any Linux machines...
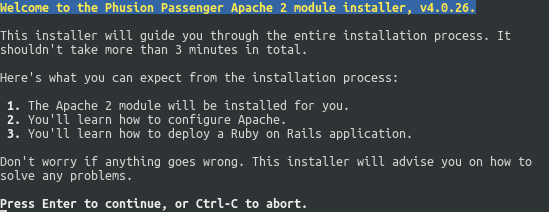 Press enter. The installer will check for required software, if the dependencies are not met, it will tell you what to install...
 5. Install all missing dependencies and re-run the install
 6. To find out where the Apache config file is, try these commands
7. Our Apache config has this at the end.
Prepare System
1. Create a local account that will be used for passenger config$ sudo useradd samdc $ sudo passwd samdc $ su - samdc2. Install RVM and Ruby using this post (How to Install RVM, Ruby and Rails), up to step 10.
Install Passenger
3. Start apache$ sudo apachectl start4. Install passenger
$ gem install passenger
$ passenger-install-apache2-module
This runs the installer...
$ sudo yum install httpd-devel
$ sudo yum install apr-devel
$ sudo yum install apr-util-devel
$ passenger-install-apache2-module
A number of sources will be compiled and after that it will ask to update our Apache config...

$ apachectl -V | grep HTTPD_ROOT
 -D HTTPD_ROOT="/etc/httpd"
$ apachectl -V | grep SERVER_CONFIG_FILE
 -D SERVER_CONFIG_FILE="conf/httpd.conf"
From that, our config file is in /etc/httpd/conf/httpd.conf
7. Our Apache config has this at the end.
$ cat /etc/httpd/conf/httpd.conf
...
IncludeOptional conf.d/\*.conf
Which means we can maintain our extensions separately. In our case, what we want to do is to create a file called passenger.conf, then we can add the lines as indicated by the passenger installer from step 5 of this guide.
$ sudo vi /etc/httpd/conf.d/passenger.conf
$ cat /etc/httpd/conf.d/passenger.conf
LoadModule passenger_module /home/samdc/.rvm/gems/ruby-2.0.0-p353/gems/passenger-4.0.26/buildout/apache2/mod_passenger.so
PassengerRoot /home/samdc/.rvm/gems/ruby-2.0.0-p353/gems/passenger-4.0.26
PassengerDefaultRuby /home/samdc/.rvm/wrappers/ruby-2.0.0-p353/ruby
Configure Apache
8. Create directories that we will use later$ sudo mkdir /etc/httpd/sites-available $ sudo mkdir /etc/httpd/sites-enabled9. Add a virtual host for our rails app
$ sudo vi /etc/httpd/sites-available/depot.conf
<VirtualHost *:80>
   ServerName www.depot.com
   ServerAlias depot.com
   DocumentRoot /home/samdc/prod/depot/public
   <Directory /home/samdc/prod/depot/public>
      AllowOverride all
      Options all
      Require all granted
   </Directory>
</VirtualHost>
10. Tell Apache about our virtual hosts
$ vi /etc/httpd/conf/httpd.confAdd this at the bottom:
Include sites-enabled/*.conf11. Link the virtual host definition to sites-enabled
$ sudo ln -s /etc/httpd/sites-available/depot.conf /etc/httpd/sites-enabled/depot.conf12. Add ServerName entry to /etc/hosts file
$ vi /etc/hosts
127.0.0.1 www.depot.com
127.0.0.1 depot.com
Configure SELinux
13. Suspend SELinux$ sudo setenforce 014. Install checkpolicy
$ sudo yum install checkpolicy15. Walk through SELinux log and generate new SELinux policy module
$ sudo grep httpd /var/log/audit/audit.log | /usr/bin/audit2allow -M passenger16. Make policy active
$ sudo semodule -i passenger.pp17. Switch SELinux back to enforcing mode
$ sudo setenforce 118. Restart Apache
$ sudo apachectl restart
Deploy Rails App
19. Copy all files to the deploy directory$ cp -r /home/samdc/dev/depot/ /home/samdc/prod/20. Install all gems required
$ cd /home/samdc/prod/depot/If using a different db in production, e.g., mysql, change the Gemfile to add that for production
$ vi Gemfile
group :production do
  gem 'mysql2'
end
$ bundle install21. Create the database
$ mysql -u root -p
> CREATE DATABASE depot_production DEFAULT CHARACTER SET utf8;
> GRANT ALL PRIVILEGES ON depot_production.* TO 'username'@'localhost' IDENTIFIED BY 'password';
> EXIT;
22. Configure rails production yml file
$ vi config/database.yml
production:
  adapter: mysql2
  encoding: utf8
  reconnect: false
  database: depot_production
  pool: 5
  username: username
  password: password
  host: localhost
23. Lets load the database
$ rake db:setup RAILS_ENV="production"
$ rake db:seed
24. Change production environment settings
$ vi config/environments/production.rb
config.serve_static_assets = true
config.assets.compile = true
25. Precompile assets
$ rake assets:precompile26. Now browse to http://depot.com
11.09.2013
Rails Cheat Sheet
1. Create rails application
$ rails new demo2. Examine installation
$ cd demo
$ rake about
3. Start the application
$ rails server4. Create a controller and actions
$ rails generate controller Say hello goodbye
$ rails generate controller Store index
5. Generate a scaffold
$ rails generate scaffold Product title:string description:text image_url:string price:decimal
$ rails generate scaffold_controller LdapUsers  # generate only controller and views, say if model had been predefined.
With relationships
$ rails generate scaffold LineItem product:references cart:belongs_toDestroy just created scaffold
$ rails destroy scaffold LineItem6. Apply the migration
$ rake db:migrate7. Run the tests
$ rake test
$ rake test:models - only the models directory
8. Populate table with test data
$ rake db:seed9. Rollback the migration
$ rake db:rollback10. Open up rails console
$ rails console
$ rails c
11. Add a column to a table
$ rails generate migration add_quantity_to_line_items quantity:integer12. Create a migration
$ rails generate migration combine_items_in_cart13. Clear the logs
$ rake log:clear LOGS=test14. Create a mailer
$ rails generate mailer OrderNotifier received shipped15. Create an integration test
$ rails generate integration_test user_stories16. Generate documentation in HTML format. First modify README.doc then...
$ rake doc:app17. See how much code is written
$ rake stats18. Loading production db
$ rake db:setup RAILS_ENV="production"19. Generate rake task
$ rails g task perfdb get_baselines
      create  lib/tasks/perfdb.rake
How to Install RVM, Ruby and Rails
For my reference:
http://yakiloo.com/using-rvm/
http://ryanbigg.com/2010/12/ubuntu-ruby-rvm-rails-and-you/
http://rvm.io/rvm/best-practices
For this installation I followed what’s called single user installation, which is the recommended way of installation, this is an isolated install within a user's $HOME, not for root.
12. Let’s install Rails. We wan’t to make use of GemSets so we can easily manage versioning in our installs. Create a gemset:
17. To make use of automatic install of rubies, you can specify a flag in ~/.rvmrc
http://yakiloo.com/using-rvm/
http://ryanbigg.com/2010/12/ubuntu-ruby-rvm-rails-and-you/
http://rvm.io/rvm/best-practices
For this installation I followed what’s called single user installation, which is the recommended way of installation, this is an isolated install within a user's $HOME, not for root.
Install RVM
1. Install prerequisites$ sudo yum install sqlite-devel nodejs openssl2. Set rvm_path
$ echo 'rvm_path="$HOME/.rvm"' >> ~/.rvmrc3. Install RVM as a single user ( background info: https://rvm.io/rvm/install)
$ \curl -L https://get.rvm.io | bash -s stable4. At this point, RVM should have been installed, check if rvm was installed correctly by loading it then checking it’s type:
$ source ~/.rvm/scripts/rvm
$ type rvm | head -n 1
rvm is a function
5. Make sure that the latest version is installed
$ rvm get stable6. Run the rvm requirements to get all the dependencies for RVM, this might prompt for your password when it needed to install missing packages:
$ rvm requirements
Checking requirements for fedora.
Installing requirements for fedora.
Updating system
Installing required packages: patch, gcc-c++, patch, readline-devel, zlib-devel, libyaml-devel, libffi-devel, openssl-devel, autoconf, automake, libtool, bisondelacs password required for '/usr/bin/env PATH=/usr/local/bin:/bin:/usr/bin:/usr/local/sbin:/usr/sbin:/usr/local/bin/Aptana_Studio_3:/auto/home3/delacs/bin:/auto/home3/delacs/.rvm/bin:/sbin yum install -y patch gcc-c++ patch readline-devel zlib-devel libyaml-devel libffi-devel openssl-devel autoconf automake libtool bison':
....................................................................................................................................................................................................................
Requirements installation successful.
Install Ruby
7. Now let’s install Ruby:$ rvm install 2.0.08. The above command should install RubyGems with it, if in case there is an issue such that RubyGems was not able to install due to some checksum error, go to one version below the latest, e.g.,
$ rvm rubygems latest9. Let’s tell RVM to use Ruby 2.0.0 as our default
$ rvm use ruby-2.0.0-p247 --default
Using /home/samdc/.rvm/gems/ruby-2.0.0-p247
10. Let’s check the version of Ruby in our environment
$ ruby -v
ruby 2.0.0p247 (2013-06-27 revision 41674) [x86_64-linux]
Install Rails
11. First, let’s set our gems environment, due to some contraints (I think it’s the corporate firewall preventing installation of certs) Add these lines to your ~/.gemrc::ssl_verify_mode: 0 :sources: - http://rubygems.org/ - http://gems.github.com gem: --no-rdoc --no-riThe last line is to not install rdoc and ri
12. Let’s install Rails. We wan’t to make use of GemSets so we can easily manage versioning in our installs. Create a gemset:
$ rvm gemset create RailsDev
gemset created RailsDev => /auto/home3/delacs/.rvm/gems/ruby-2.0.0-p247@RailsDev
13. Let’s use that GemSet:
$ rvm gemset use RailsDev
Using ruby-2.0.0-p247 with gemset RailsDev
Let’s check if we are using that gemset
$ rvm gemset name
RailsDev
14. Now let’s install all gems that we need
$ gem install rails --version 4.0.115. Lets verify the installation
$ rails -v
Rails 4.0.1
16. To make use of this RVM environment, we can specify 2 files in the project’s root folder:
$ cat .ruby-gemset
RailsDev

$ cat .ruby-version
ruby-2.0.0-p247
To learn more about RVM and its environment, refer to these posts: http://yakiloo.com/using-rvm/ http://stackoverflow.com/questions/15708916/use-rvmrc-or-ruby-version-file-to-set-a-project-gemset-with-rvm
17. To make use of automatic install of rubies, you can specify a flag in ~/.rvmrc
rvm_install_on_use_flag=118. You also make bootstrapping a project happen via cd into the project directory, by adding this to ~/.rvmrc
export rvm_project_rvmrc=119. To access webrick from another system, firewall needs to be opened up for port 3000 as follows:
$ sudo firewall-cmd --permanent --zone=public --add-port=3000/tcp
$ sudo systemctl restart firewalld.service
Subscribe to:
Posts (Atom)